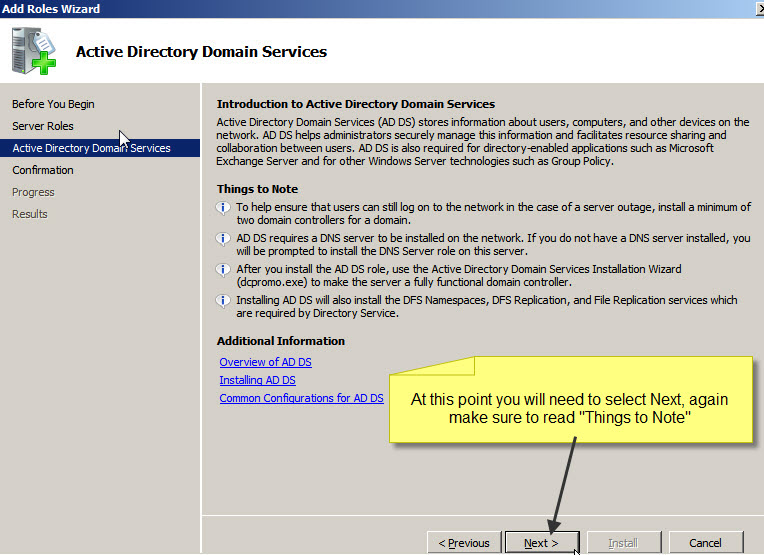
Everyone who uses Veeam today is familiar with the product Veeam Explorer for Microsoft Exchange. It has made item level recovery a dream; you almost wish people would delete email, just to use it….. no not really, but that is how simplified the process is. Version 6.5 supports Microsoft Exchange 2010, however today you can get the Beta for version 7 that supports both Microsoft Exchange 2010 and 2013. The beta works great; it will be fully integrated with Veeam Backup and Replication v7. With the beta not everything works as seamless when it comes to mounting the backup directly to the Veeam Explorer console, but it will when it is fully released. If you would like to download the Beta head over to Veeam and get started.
What has the new version brought to the table?
· Support for Exchange 2013
· Improved engine of restoring items back to the Exchange Server
What Features do you get?
· Explorer like interface that allows you to look into your Exchange Backups and locate things quickly with a familiar interface.
· Search capabilities across one or many mailboxes; quickly find what you are looking for.
· Ability to export to a PST file with no commands to run, export to MSG files to store in a folder, or send as attachments.
· Recover to the original mailbox or a different one.
· No Agents! For backup or restores
· No need to restore the backup
· No special backup, if you already have Exchange 2013 backups you can even use them. Even if the backups came from another source. You just need to point the tool to the Exchange Database File (EDB)
Beta Requirements
· Veeam Backup & Replication 6.5
· Microsoft Windows 2008 or later (64-bit)
· Microsoft Exchange 2010 or 2013
· Microsoft Outlook 2010 or later 64-bit, only if you want to export PST
Install
**To install the v7 Veeam Explorer you will need to uninstall the previous version.
Go to the Control Panel, and launch “Program and Features” and remove “Veeam Explorer for Exchange”

Extract the files from “Veeam_Explorer_for_Exchange_7.0.0.481” you should now be able to execute “VeeamExplorerForExchange.msi”
The first screen you will see is the welcome screen, click “Next”

Accept the “EULA”

Choose your install location.

At this point you are ready to install

Within a few seconds the install is complete.

Now the real work begins, Restore time
With the beta version like I mentioned above you need to do a couple of extra steps. Please remember these extra steps are just for the beta, and when it is fully released you will not have to do this.
Open up the Veeam Backup & Replication console. In the left window expand “Backups” and click on “Disk”, in the right window you will now see all your backups. Expand the disk that contains your Exchange 2013 backup. Right click the backup and select “Restore Guest File (Windows)”. This will mount the backup to your Backup Server. In my setup the location is “C:\VeeamFLR\Exchange02”.

At this point you should see the “Restore Wizard” pick the restore point you would like to recover data from.

Click “Next” and enter in a restore reason if you would like.

Click “Finish” and wait a few moments while the backup mounts to your server.

At this point you should see the following screen. In the ribbon at the top of the screen you will see “Exchange Items” we are now going to click that and it will launch the Veeam Explorer Console. 
If this is your first time running the Veeam Explorer console, we do need to do one extra step. We need to provide the application with the Exchange Database Storage Engine file (ese.dll) you can locate this file from your Exchange server. In my setup I have copied the file to my backup server and stored it in a folder on the C Drive called ExchangeDLL. The location of the file on your Exchange Server resides in the bin folder my setup its located at “C:\Program Files\Microsoft\Exchange Server\V15\Bin” Once you have copied the file to your backup server we are going to point Veeam Explorer to the proper location. **You only have to do this once**
Click “Options”

Click “Browse” for the version of the ese.dll you want to specify.

Locate the file you copied from your Exchange Server, click “open” then click “ok”.

This is the section where we point Veeam Explorer to the mailbox database. Click “Add Store”

You will be prompted with the following window. You now need to locate your EDB file, you may have more than one Mailbox Database, if you do select the one where the mailbox resides that you need.

The file location will vary, depending on your setup. However the database file will be in the same folder location as it is on your Exchange Server. Remember all we are doing is looking at a mounted copy of your Exchanger Server Backup. Once you have the file located, select it and click “open”

You are now told “online Exchange backup detected, log replay is required” this is normal, and now the logs will be replayed to the database. Click “Recover”

Explorer view of your Exchange Database is visible. From here you can see all users who are located in this mailbox database.

We are going to go ahead and restore some items. But first we need to delete some! From my Administrator account I am going to go ahead and delete everything from the account including e-mails, calendar items, and tasks. You will need to take my word for it. Like I said I deleted everything from my account, I want to restore all the items. Here I could go and restore the entire administrator mailbox, but I want more control. In this example I will go ahead and use the “Advanced Find” and add the criteria that I want to show any item over 1KB in size which happens to be everything in that account.

At this point I am ready to restore the email back to it original location. I have selected all the items I want to recover, right clicked an item and click “Restore to…”

If you notice from the information below, I am also restoring this email to a server that is not part of the same domain as my backup server. But it is no issue; we have the ability to specify different credentials. I populated the Mailbox account I want to restore the items, but this could have been any mail account in my Exchange Organization.

The CAS server address should be populated; you can change this if you must. You can also select the location to restore the items; you can put everything back to the original location or specify a different folder.

Here you can select if you want to only restore changed items, deleted items, and if you would like to mark all restored items as unread.

Once you hit restore you will see a status window.

When the Job completes you will get a status window to let you know the outcome of the restore. In my case I didn’t delete a contact so the items merged. Even though this was a small restore it only took 15 seconds! Imagine the hero you can become when you can restore items to someone’s email within a few minutes.

You don’t always have to restore to the production Exchange Server. Below I will explain your other options.

Open: Allows you to open the item within Veeam Explorer to look at the item in more detail.

Save to .msg file: from here you can save the item as a .msg to a location of your choosing

Save to Desktop: Will save the file as a .msg to the desktop
Send to: Attaches all the items to an email that you can send directly to another mailbox, and from within Veeam Explorer.

Export to .PST file: Export a selected amount of items or the entire mailbox to a .PST file. You can specify the filename and the location
Export to Desktop\Mailbox: This will automatically export your selection to the desktop with the name of the mailbox.
Veeam Explorer for Exchange also comes with the Veeam Backup Free Edition. Even with this being a beta feature it is rock solid. If you are not running Veeam today head over to www.veeam.com and check out all the great solutions Veeam has developed to ease the stress for Virtualization administrators around the world. You can always tell the Administrators who run Veeam; they are the ones who look well rested with a simile on their face.